Trail 04 · Bearings
Queen's Domain map
Use this Queen's Domain map as a route schematic: select a region for its landmark and next objective. It shows progression, not exact corridors, compass directions or your live position.
Reviewed 19 November 2026 · Original progression schematic · not a geographic map
Choose a region
Progression order · not geographic scaleSelect a stop to read its gate and onward objective. The late return circuit is separate from your first journey.
Isle of Neasied
Look for: Starting beach, Knight's Encampment and Endu Shrine.
Next objective: Obtain Endu and two ordinary Wind Gems before the Obmuer route.
Opening Wind Gem locations →Obmuer Temple
Look for: Flooded approach and four-slate entrance.
Next objective: Follow the Trident-key route and Dagoom objective; resolve beacon progression.
Temple walkthrough →Tower of Knowledge
Look for: Tower mechanisms and Archives branch.
Next objective: Complete the tower route and look for the onward lower exit.
Tower walkthrough →Deimpo & dungeon
Look for: Mausoleum, fourth Wind Gem and the sealed-dungeon thread.
Next objective: Check the Mask of Second Sight, Peha's lens and green seals.
Deimpo progression →Ancient World
Look for: Exterior machinery, seal breakers and electrical towers.
Next objective: Find the fifth ordinary gem and follow the mechanisms toward Lord Saijha.
Fifth Wind Gem →Siraatsu Castle
Look for: Castle route and first ending opportunity.
Next objective: Save before a final commitment; later branches need more preparation.
Ending preparation →Return circuit
Look for: Record of Sin, Verdant Hollow, Rotting Cavern and Petrified Garden.
Next objective: Revisit for lenses, NPC objectives and later branch requirements. This is a grouped circuit.
Late branch requirements →Temple & final return
Look for: Temple Puwema and the return to Siraatsu.
Next objective: Choose the late weapon route you have actually prepared; keep ending details separate.
Queen's Domain endings →Where do the regions sit in the route?
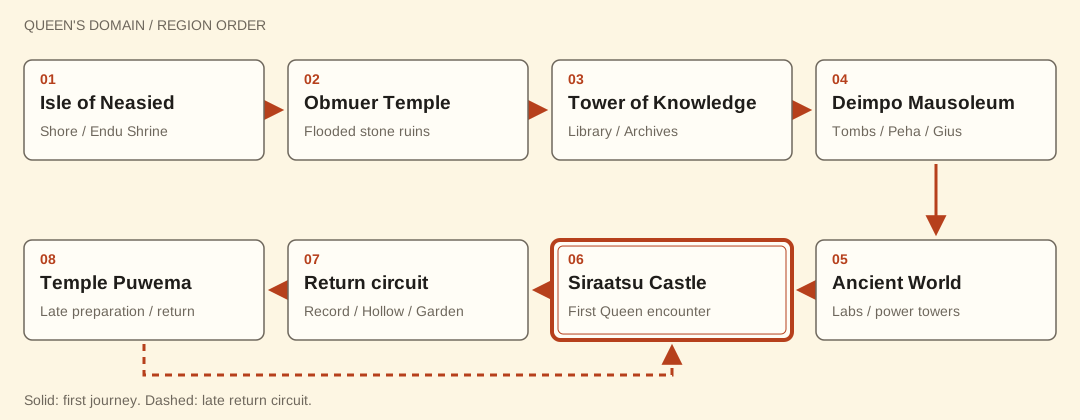
The upper row is the first journey across the shore, flooded temple, library tower and tomb complex. The lower row turns back across the page: Ancient World leads toward Siraatsu Castle; dashed arrows then separate later exploration from the initial castle visit. Number labels, rather than screen position, define the reading order.
This Queen's Domain map groups eight progression stops. It is an original region schematic, not an extracted floor plan: the library and Mausoleum are not placed at measured compass coordinates, and the arrows do not represent walking distance. Use the region buttons for a short landmark note, or open the full-size diagram.
Shore, water temple and the library tower
Isle of Neasied is the starting shore and surface hub. The first diagram node includes Knight's Encampment and Endu Shrine; it does not put them in separate disconnected regions. The second node is Obmuer Temple, reached through the flooded approach. The island beacons and return through the surface route connect this stage with the Tower of Knowledge.
The tower has several floors and optional loops. Its story exit toward Deimpo is the bridge opened beside Budaen after clearing the growth. This is why the diagram connects the Tower to the Mausoleum rather than drawing the tower summit as a final destination. For the exact book, beacon and exit steps, use the Tower of Knowledge walkthrough.
Mausoleum, Ancient World and the castle
The Deimpo node includes the tomb descent, Peha and the route through the paired aberration encounter. The onward metal corridor is beside King Gius. That continuation reaches the industrial Ancient World, with its laboratories, teleporter houses and electrical towers.
The solid path ends at Siraatsu Castle after Lord Saijha. The castle's double outline marks the transition to an ending opportunity and later return preparation; it does not mean the island's other branches are complete. The Siraatsu Castle chapter identifies the machine halls, ritual room and Queen chamber.
What is grouped into the dashed return circuit?
The return node groups Record of Sin, Verdant Hollow, Rotting Cavern and Petrified Garden because they become part of later lens, quest and collection routes. It does not claim those four areas form a single corridor or that their locations coincide.
Temple Puwema has earlier and later objectives. Its placement at the final schematic stop represents the late preparation and return toward the Queen, not a claim that the Temple cannot be visited earlier. The dashed route back to the castle distinguishes a return with new preparation from the first visit.
Use the late return circuit chapter for that stage's objectives. The ending branches are separate and folded by default. Ordinary dash-upgrade locations have their own Wind Gem diagrams, so they are not disguised as exact pins on this overview.
What the diagram leaves out
The drawing shows region relationships and progression phases. It does not show every room, secret wall, chest, Silver Skull, elevation or local shortcut, and it does not track your character. A detailed regional floor plan and a progression diagram answer different questions.
The region sequence and named exits are checked against Digitol's firsthand route, reviewed 19 November 2026. The visual layout, numbering and arrow legend are original to this guide. For a local gate or a room-by-room objective, continue to the Queen's Domain walkthrough.
Before you turn back
Questions from the trail
Is this an official or extracted Queen's Domain map?
No. It is an original fan-made progression schematic based on linked community routes. Positions show reading order, not the game's geography or walking distance.
Does the schematic show every collectible?
No. It focuses on major regions and progression gates. It does not mark every chest, skull, enemy, secret wall or local shortcut.
No trail notes yet. Be the first to leave a useful landmark.